
Tiny Tins, Big Memories: DIY 3D Photo Keepsakes from Thrifted Finds

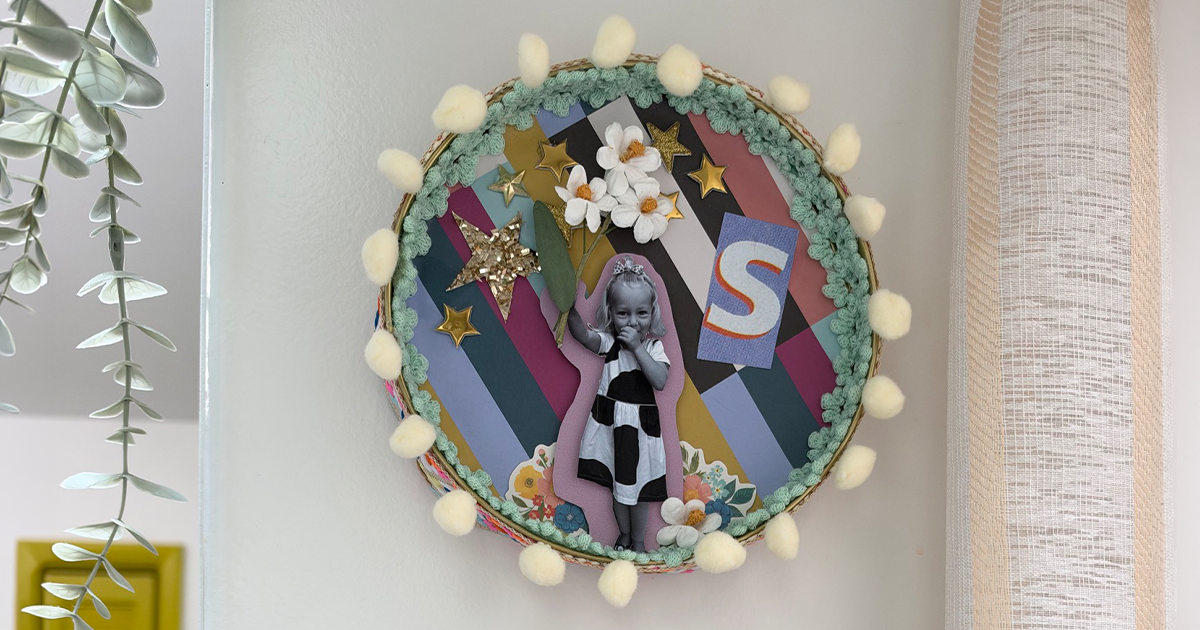
Turn secondhand tins and your favorite photos into whimsical miniature portraits, personalized magnets, and one-of-a-kind keepsakes.
Some memories deserve more than a spot in your camera roll.
What if you could take your favorite family photos and turn them into tiny, three-dimensional works of art? Something you could hang on a wall, display on your fridge, or give to someone special?
In this episode of Goodwill's Second Chance Studio, Natasha transforms thrifted tins into colorful, whimsical photo vignettes using scrapbook paper, fabric, ribbon, and layered photographs.
It's part collage, part miniature art, and entirely personal.
And it all starts with an unexpected Goodwill find.
Watch the Full DIY 3D Photo Keepsake Tutorial
Join Natasha as she walks through choosing the right tins, preparing photos, layering materials, and creating miniature scenes full of personality.
What You'll Need
Materials
- Thrifted tins or tin lids in assorted shapes and sizes
- Printed family photos, pet portraits, or other favorite images
- Scrapbook paper, patterned paper, or other collage materials
- Ribbon, fabric trim, or pom-pom embellishments
- Stickers and decorative cutouts (optional)
- Foam adhesive tape for creating dimension
- Paper-to-metal craft adhesive, such as Weldbond
- Hot glue and glue gun
- Clear epoxy suitable for attaching magnets
- Magnets or ribbon for hanging
Tools
- Cutting mat
- Scissors
- Precision craft knife
- Pencil or pen
- Paint or paint markers (optional)
A quick safety note: Use craft knives, hot glue, and epoxy with care. Follow product instructions, work in a well-ventilated area when required, and supervise younger crafters.
Step 1: Find Your Tins at Goodwill
Every great thrift flip starts with a little imagination.
Natasha looks for tins that can become miniature displays for family photos. Shallow tins work especially well, but the lids of larger tins can also create the perfect backdrop.
Try mixing round and square shapes to make your collection more interesting.
Look for tins without dents, particularly around the edges, so your backgrounds and decorations fit neatly.
Natasha chooses two larger tins to hang on the wall and several smaller ones to turn into magnets.
Thrifting tip: Don't worry about the original design on the tin. You're giving it a completely new personality!
Step 2: Choose a Color Palette
Before cutting and gluing, decide what kind of look you want.
Natasha goes for a playful, whimsical, nostalgic style with colorful patterns and interesting textures.
If you're creating multiple tins, choosing a shared color palette can help them feel like a coordinated collection while allowing each piece to have its own personality.
Gather scrapbook paper, ribbon, fabric trim, and embellishments that work together.
You can even bring a sample of your patterned paper when shopping for ribbon to make matching colors easier.
Step 3: Select and Print Your Photos
Now for the stars of the show!
Use photos you already have or take new pictures specifically for this project.
Natasha photographs her family against a simple background, making it easier to cut out each person later. A blank wall works perfectly, but a hanging sheet can do the trick, too.
Think about how each pose might interact with the miniature scene.
- Standing poses: Create the illusion of someone standing inside the tin.
- Seated poses: Let legs or feet appear to dangle over the edge.
- Action shots: Add playful movement and personality.
- Pet photos: Perfect for adorable fridge magnets.
Natasha prints her photos at 4×6 inches, adjusting the images so they fit inside her chosen tins.
Black-and-white photos can also create an interesting contrast against colorful backgrounds.
Step 4: Carefully Cut Out Your Photos
Use scissors to remove most of the background around each person or pet.
Then switch to a precision craft knife for smaller details, such as fingers, hair, clothing, and feet.
Work slowly on a cutting mat and keep your supporting hand away from the blade.
For seated or action poses, pay special attention to the details that will help the finished figure look realistic.
Helpful tip: Place your cutout against contrasting paper to spot any areas you may have missed.
Step 5: Create Your Miniature Backgrounds
It's time to give those tins a makeover!
Trace the outline of each tin or lid onto your chosen paper, then cut just inside the traced line so the background fits neatly.
Use a paper-to-metal craft adhesive to secure the paper inside the tin, following the adhesive's instructions for application and drying.
You can keep the background simple or experiment with layered patterns, textured paper, and other collage elements.
And if you change your mind? That's part of the creative process.
Natasha replaces one background with embroidered paper after deciding the original pattern wasn't quite right.
Sometimes the second idea is the winner!
Step 6: Add Personality with Collage Details
Before attaching your photos, arrange any extra decorations you want inside the tins.
Natasha uses playful elements like balloons, stars, flowers, and colorful paper shapes to reflect her family's personalities.
She also creates contrasting paper silhouettes behind some of the photos to act as decorative shadows.
To make a shadow, loosely trace around your photo and cut out a slightly larger shape.
Don't worry about making it perfect. Curves and unexpected shapes can add to the whimsical look.
Try arranging everything before gluing so you can experiment with placement, colors, and layers.
Step 7: Bring Your Photos to Life with 3D Layers
Here's where the magic happens!
Natasha uses foam adhesive to lift her photos and decorations away from the background, creating a miniature three-dimensional effect.
Apply small pieces of foam adhesive behind the main areas of your paper shapes, then peel off the protective backing and attach them.
For extra dimension, stack multiple layers of foam adhesive.
Natasha uses several layers on her pet magnets to make the figures really pop. She also bends the knees and feet of some seated photo cutouts to create the illusion of legs hanging over the edge.
You can tuck smaller collage pieces behind the figures to create even more depth.
Creative tip: Start with one layer of foam adhesive and add more until you achieve the look you want.
Step 8: Add Ribbon and Finishing Touches
Now give your tins a little extra flair!
Natasha uses fabric ribbon, textured trim, pom-poms, and decorative flowers to finish her miniature portraits.
She uses different adhesives depending on the materials:
- Paper: Paper-to-metal craft adhesive
- Ribbon and fabric: Hot glue
- Dimensional layers: Self-adhesive foam tape
- Magnets: Clear epoxy suitable for metal
Add interior ribbon before securing any elements it needs to sit behind.
For a coordinated collection, repeat a few colors or textures across your tins while giving each piece its own unique details.
Step 9: Turn Your Creations into Magnets or Hanging Art
Once your miniature portraits are complete, decide how you'd like to display them.
For magnets, Natasha attaches magnets to the backs of her tins using clear epoxy. Follow the product's instructions and allow it to cure fully before displaying.
For hanging artwork, she attaches ribbon to the back of her lightweight tins using hot glue. Heavier pieces may require a stronger adhesive or another secure hanging method.
Use appropriately rated hooks or mounting hardware for the weight of each finished piece.
Now they're ready to hang on a wall, brighten up your fridge, or become a thoughtful gift.
Little Works of Art with a Lot of Heart
What makes this project special isn't just the colorful paper or clever three-dimensional effects.
It's the memories.
Natasha creates keepsakes featuring her children, playful pet magnets, and a personalized gift for her parents inspired by their home's colors and love of flowers.
Each piece tells a different story, and each one is completely unique.
You can even adapt the idea beyond family portraits. Try a favorite vacation photo, a picture of a new home, or a meaningful quote.
In a world where so many of our favorite memories live on screens, there's something especially wonderful about turning them into something you can hold, display, and enjoy every day.
So the next time you're browsing Goodwill, don't overlook those little tins.
They might just be the beginning of something unforgettable.
Ready for more creative inspiration? Explore Goodwill's Second Chance Studio for DIY projects that give everyday finds a second chance.