
How to Make DIY Wooden Block Characters With Thrifted Finds
-2.png?sfvrsn=d79aee4_1)
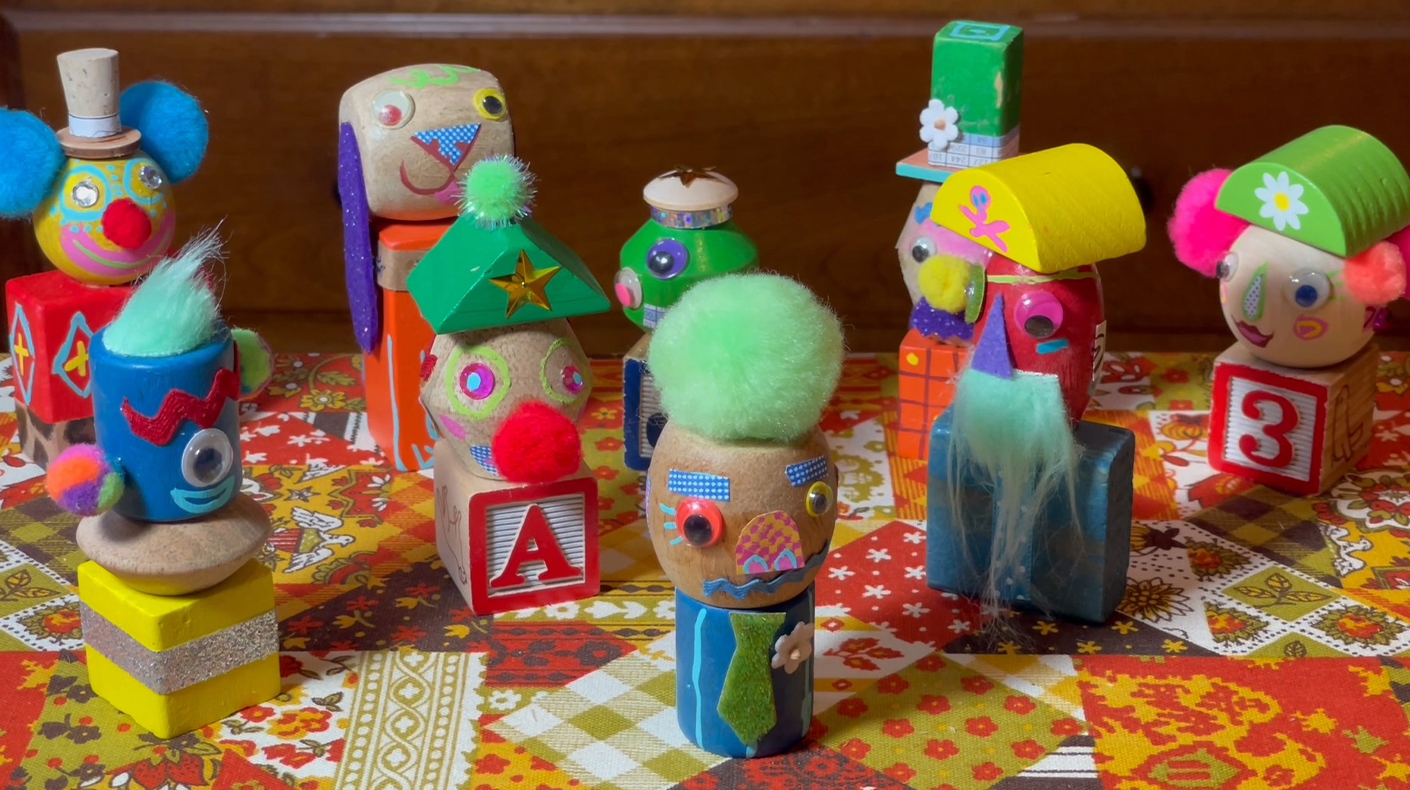
What do you get when you combine a few wooden blocks, some unexpected thrift finds and a very active imagination?
A whole cast of new friends.
In this episode of Second Chance Studio, Chicago-area artist and toy maker Britton transforms secondhand wooden blocks and other reclaimed materials into whimsical characters he calls Block Buddies.
Robots, monsters, animals, people—there's no telling who might show up. And that's exactly the point.
Watch the Block Buddies Come to Life
Join Mr. Walters (and a very special guest woodworking instructor) to learn how to build and decorate your own Block Buddies from thrifted materials.
What You'll Need
For the basic Block Buddy construction:
- Thrifted children's wooden blocks
- Large wooden beads or other wooden shapes
- Wooden dowels or skewers
- Wood glue
- Clear tacky craft glue
- Electric drill and appropriately sized drill bits
- Coping saw or small craft saw
- Protective eyewear
- Scrap wood or plywood to protect your work surface
For decorating:
- Scissors
- Glue stick or school glue, if needed
- Craft and decorative materials you already own or find secondhand
Safety note: This project involves drilling and sawing. Use appropriate eye protection, secure your workpieces with clamps or another suitable holding method, and follow tool safety instructions. Children should leave cutting and drilling to a capable adult.
Step 1: Find Your Block Buddy's Building Blocks
Start in the toy aisle at Goodwill.
Traditional alphabet blocks, simple wooden building blocks and other small wooden objects can all become the foundation of a character.
Look for a variety of shapes and sizes. A rectangular block might make a great body, while a round bead could become a head.
Don't limit yourself to matching pieces. Sometimes an unexpected combination is what gives a character its personality.
Thrift Tip: Look Beyond the Toy Aisle
Wooden beads, craft supplies and other decorative objects might be just as useful as traditional blocks.
Instead of shopping for a finished character, look for shapes that could become one.
Step 2: Choose Your Character's Shape
Before attaching anything, experiment with different combinations.
The basic Block Buddy starts with two main pieces:
- A body
- A head
Place different wooden shapes together and see what they suggest.
Does a round head and square body look like a robot? Could an unusually shaped bead become an alien? Does a particular combination remind you of a friend, pet or coworker?
You don't need to decide everything right away. Sometimes the character reveals itself as you work.
Step 3: Prepare the Pieces for Assembly
To create a sturdy connection between the head and body, this project uses a small wooden peg fitted into holes drilled into both pieces.
First, protect your work surface with a solid piece of scrap wood or plywood.
Select a drill bit that matches, or is slightly larger than, the thickness of your wooden dowel or skewer.
Mark where the head and body will connect, then carefully drill a shallow receiving hole into each piece.
The holes should be deep enough to hold the connecting peg securely without drilling through the pieces.
Woodworking tip: Clamp the pieces securely before drilling. Avoid holding small blocks or beads directly in your hand while operating the drill.
Step 4: Connect the Head and Body
Cut a short section of wooden dowel or skewer to create the connecting peg.
Before gluing, test how the pieces fit together.
The peg should fit into both receiving holes, allowing the head and body to meet securely.
Once you're happy with the fit, apply a small amount of wood glue inside each hole and assemble the pieces.
Allow the glue to cure according to the manufacturer's instructions before decorating or handling the figure extensively.
And just like that, your Block Buddy has a body.
Now it needs a personality.
Step 5: The Buddy Is in the Details
This is where the real character-building begins.
Gather your decorative materials, protect your workspace and decide who—or what—your Block Buddy might become.
Maybe it's a robot with an unusual expression. Maybe it's a monster, a pet or a tiny version of someone you know.
You can sketch your ideas first or let the design evolve as you go.
Keep it simple or get as elaborate as you'd like.
There's no single right way to make a Block Buddy. The fun comes from turning a few ordinary shapes into a character that couldn't have existed without your imagination.
Step 6: Give Your Block Buddy a Home
Once your creation is finished, it's time to introduce your new friend to the world.
Display your Block Buddy on a shelf, desk or windowsill. Make a few characters to create an entire collection, or give one as a handmade gift.
You could even create characters inspired by family members, friends, coworkers or pets.
Just remember that handmade figures with small parts are best treated as decorative art unless they're specifically constructed and tested for safe use as children's toys.
Keep Creating, Stay Curious
A wooden block doesn't have to stay a wooden block.
With a little imagination, it might become a robot, a monster, a familiar face or something that doesn't have a name yet.
And the next time you're browsing Goodwill, you might start seeing potential characters in places you never expected.
After all, every item deserves a second chance—even the ones that might become your new best friend.
Ready to find your next creative project?