How to Make a No Sew Neck Ruff Using Thrifted Materials
-2.png?sfvrsn=d79aee4_1)
A creative DIY project inspired by 16th-century fashion — made entirely from secondhand finds
If you’re looking for bold, creative DIY projects that stand out, this one brings history and style together in a completely unexpected way.
In this tutorial from Goodwill’s Second Chance Studio, creator Shelby Shaper shows how to make a 16th-century inspired neck ruff using thrifted materials — no sewing required. What was once a symbol of status in Renaissance fashion is now a versatile accessory for cosplay, events, and modern styling.
It’s also a perfect example of how DIY home décor ideas and fashion projects can overlap — using everyday materials to create something completely transformed.
What Is a Neck Ruff?
Neck ruffs became popular in 16th-century Europe and were traditionally made from structured linen or lace. They were worn as a statement piece, often reflecting status and style.
Today, they’ve evolved into a creative accessory seen in:
- Cosplay and costume design
- Renaissance fairs
- Theater and performance
- Alternative fashion
What You’ll Need
This project uses simple, accessible materials — many of which can be thrifted:
- Thrifted fabric (jeans, pants, dresses, curtains, lace)
- Fabric scissors
- Measuring tape or ruler
- Chalk or fabric marking pencil
- Iron
- Hot glue gun
- Velcro
Step 1: Thrift Your Materials
Start by heading to Goodwill and looking for long, structured fabric. Materials with low stretch and more stiffness will help create the signature ruffled shape.
Great options include:
- Jeans or pants
- Curtains
- Dresses or skirts
- Lace or ribbon
💡 Tip: Focus on structure over size — pieces can always be connected later.
Step 2: Create the Neck Base
Cut a strip of fabric about 2 inches wide and long enough to wrap comfortably around your neck.
Fold the fabric over, press it with an iron, and secure it with hot glue to create a clean, finished band.
Step 3: Cut and Prep Your Fabric Strips
Cut long strips of fabric (about 2.5 inches wide when folded).
Fold each strip in half and press it with an iron. Then:
- Glue down raw edges
- Connect multiple strips if needed
- Press seams flat
This creates one continuous piece of fabric for your ruffles.
Step 4: Build the Ruffles
Fold the fabric into small, even accordion-style sections (about 1 inch each).
As you fold:
- Add small dots of hot glue
- Press each fold into place
- Keep ruffle peaks consistent
This step forms the signature structured look of the neck ruff.
Step 5: Attach Ruffles to the Neck Base
Line up your ruffled fabric along the neck band.
- Glue the ends first for even distribution
- Then secure the rest of the ruffles
- Work carefully to keep the structure intact
Step 6: Add Closure
Attach Velcro to each end of the neck band for an adjustable, easy-to-wear finish.
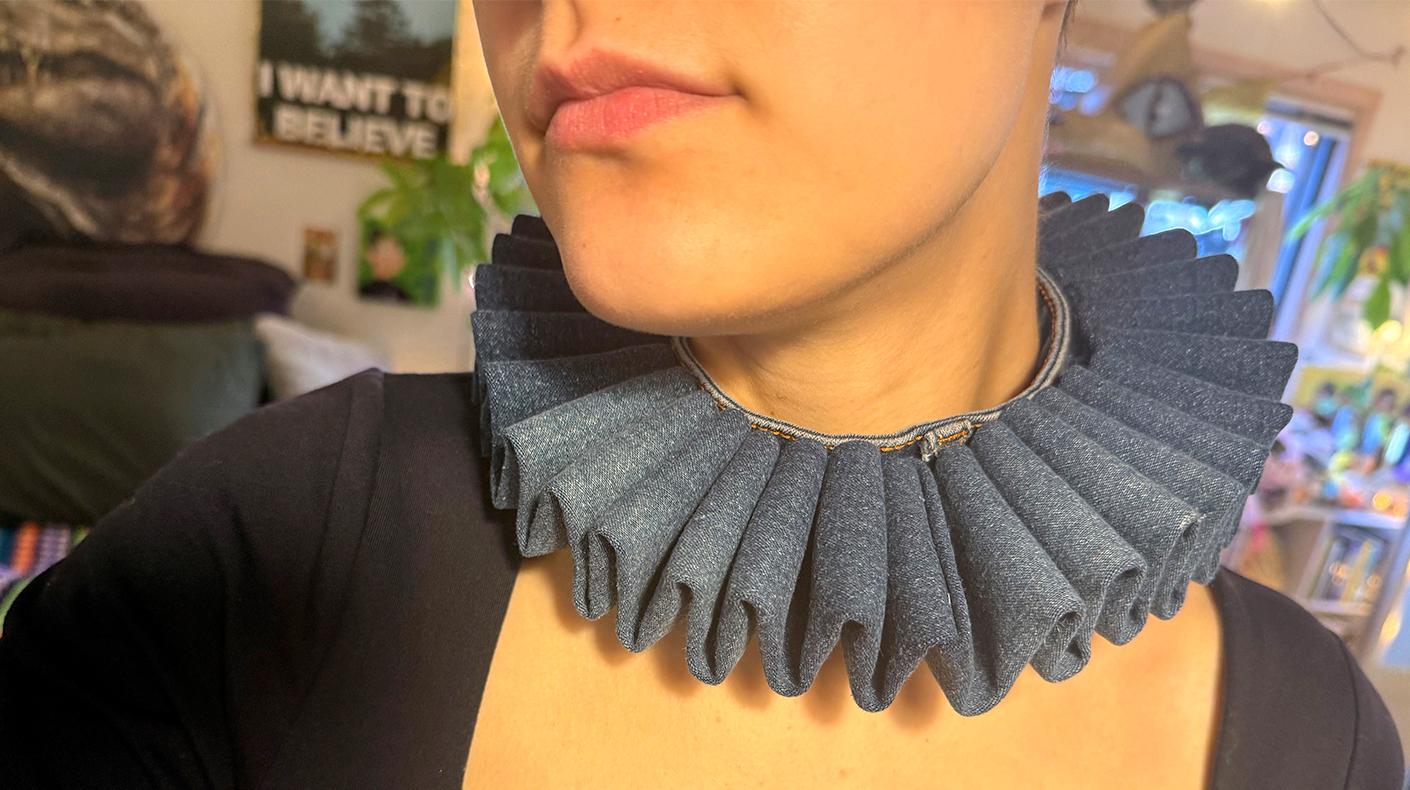
Final Look
Once complete, your neck ruff becomes a bold, versatile accessory that can be styled for a variety of looks — from theatrical to modern.
This is a great example of how DIY costume design, or even statement accessories can come from unexpected materials.
Why Thrifted DIY Works
Projects like this show how secondhand items can be transformed into something entirely new. Whether you’re creating costumes, experimenting with fashion, or looking for DIY gift ideas, thrifted materials offer endless possibilities.
Through Second Chance Studio, Goodwill continues to highlight how creativity and sustainability can go hand in hand.
Check out how our newest DIY content creator, Shelby put together this amazing look together!