How to Make a DIY Santa Cookie Plate Using a Thrifted Find
-2.png?sfvrsn=d79aee4_1)
A festive, easy upcycle project anyone can do
Looking for a fun holiday craft you can do on a budget? This adorable DIY Santa cookie plate is the perfect blend of thrifty, heartfelt, and totally giftable. In this project, mandala dot artist Cheryl Anderson—also known as The Dotting Chick—shows how a simple thrifted plate from Goodwill can become a cherished holiday tradition for your family.
Using dot-painting techniques, cozy holiday colors, and a whole lot of creativity, Cheryl transforms a secondhand plate into a whimsical “cookies for Santa” keepsake she plans to gift to her grandkids.
And the best part?
The whole project cost just 99 cents thanks to Goodwill.
Follow along to create your own cookie plate, whether you love dot painting, want an easy upcycle project, or simply need a unique homemade gift this holiday season.
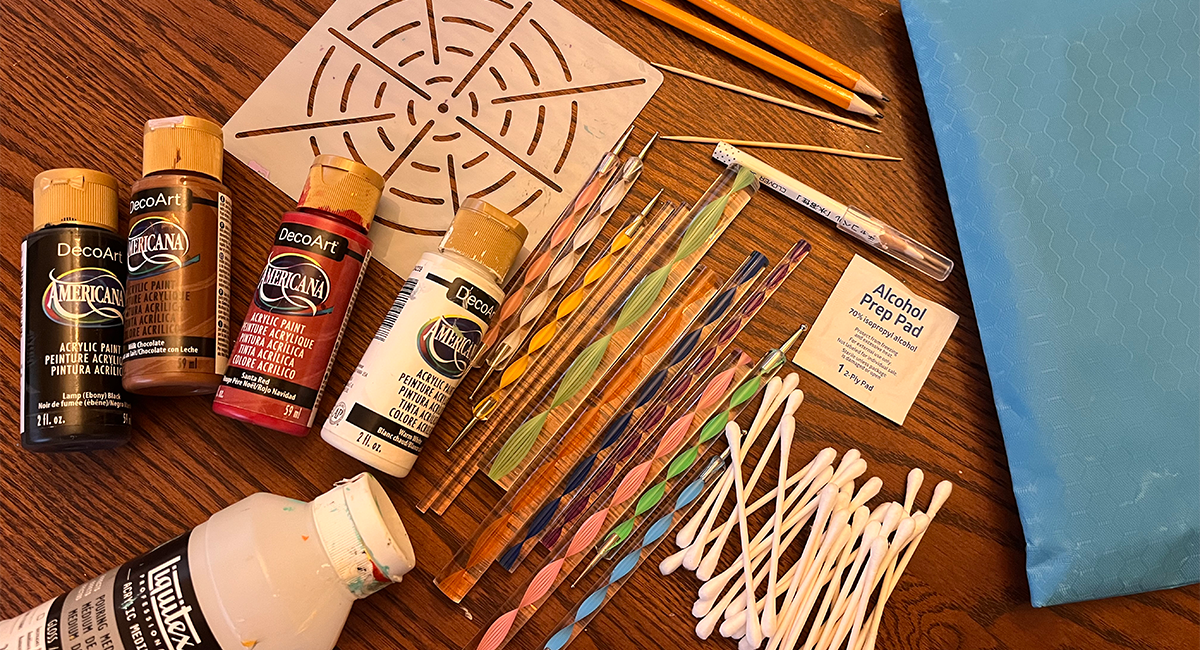
What You’ll Need
- A thrifted plate (solid color, flat center, raised rim preferred)
- Acrylic paints suitable for dot painting
- Dotting tools (or improvisations such as:
- pencil eraser
- toothpick
- stylus
- wooden dowel)
- Chalk pencil or washable marker
- Optional: stencil or grid for centering your design
- Spray glaze or clear sealant
- Paper towel, warm water
How to Make Your DIY Santa Cookie Plate
1. Choose the Right Plate
Head to your local Goodwill and look for:
- A plate with a flat center
- A slightly raised rim for your Santa design
- A solid-colored surface—black works especially well for contrast
If you want a smaller plate (so Santa doesn’t have to eat too many cookies, as Cheryl jokes), opt for something petite and simple.
Pro Tip: Plates are forgiving. If you make a mistake, you can easily wipe off a section—or wash the whole plate and start over.
2. Find Your Center
Use a chalk pencil to mark:
- The center point of your plate
- Light grid lines to help keep your mandala-style dots symmetrical
If you don’t have a stencil, no worries—hand-drawn lines work perfectly.
3. Start With the First Dot (Your Center Cookie)
Place one smooth, even dot in the center using your stylus or another small, round tool such as a pencil or dowl rod.
Make sure to:
- Dip your tool completely
- Press and gently swirl to ensure smooth edges
- Avoid overly thick paint (creates peaks) or overly thin paint (spreads out)
4. Build the First Ring of “Cookies”
Using the grid lines:
- Add four evenly spaced dots around the center.
- Add another dot between each of those to create eight total.
Each dot becomes a cute “cookie,” setting the base for your design.
5. Add Additional Rings of Cookies
Repeat the same pattern for additional layers:
- Place dots along the grid
- Add dots between them for symmetry
- Make each ring slightly larger as you move outward
This creates the classic mandala shape that looks like a full cookie platter.
Variation: Use gingerbread browns, sprinkle colors, or chocolate-chip tones to give each dot-cookie its own personality.
6. Add Embellishments: Swooshes, Chocolate Chips & Sprinkles
For each cookie:
- Add a small decorative dot at the outer edge
- Use your stylus to “swoosh” a small accent line up each side
This gives your cookies that frosted, textured, handmade holiday feel.
Add:
- Chocolate chips to darker dots
- Colored sprinkles to lighter cookie dots
- Frosting swirls to gingerbread-style dots
Every round becomes cuter than the last.
7. Use the “Walk the Dots” Technique
As Cheryl nears the rim, she uses a beginner-friendly technique:
- Dip your stylus once
- Place consecutive dots without re-dipping
Each dot gets smaller as you go, creating a beautiful tapered effect.
8. Paint Your Santas Around the Rim
This is where your plate becomes truly magical.
Create Santa using dots shaped into:
- A round head
- A red body
- Boots & mittens
- A hat with fluffy white fur
- A beard
- A belt
- Sleeve and pant cuffs
He can sit on the rim or in any spot that works with your plate shape.
9. Let It Dry & Seal With a Glaze
Once fully dry:
- Gently wipe off your chalk grid lines
- Avoid touching any wet paint—it will rub off
Then apply:
- Two light coats of spray glaze or clear sealant
(Not one heavy coat!)
This protects your artwork and gives it a finished look.
Your Upcycled Santa Cookie Plate Is Ready!
For just 99 cents and some paint, Cheryl created a whimsical plate for her grandkids—a completely unique, handmade treasure that will live on in holiday memories.
You can:
- Gift yours to a friend or family
- Use it every Christmas Eve
- Pair it with homemade cookies
- Make a whole set for a holiday party
And of course, Goodwill is full of plates, bowls, chargers, cookie sheets, and holiday décor items waiting for a second chance.

Why Make This Project With Goodwill?
Every item you purchase:
- Supports job training and employment programs
- Keeps usable goods out of landfills
- Gives new life to donated treasures
- Helps build sustainable creativity and community
As Cheryl says:
“Every item deserves a second chance.”
Watch her tutorial!